The Lead up to the Battle of Pinios Gorge
The battle of Pinios Gorge, also known as the battle for the Tempi valley, was a pivotal rearguard action fought by Anzac troops – mostly made up of Australians – from the 17th to the 18th of April, 1941. Though successful in its main goal, delaying the German advance toward the central Greek town of Larisa, it was also a case study of the things that can go wrong in the fog of war.
The battle was part of a mad scramble by the British expeditionary force to delay the Germans during the invasion of Greece. Over the previous days, German armour and manpower had proven too much for the Greek and allied forces. Now, the British and Anzac troops had to get away with as many men and materiel as they could before the invaders could capture it.
In essence, the plan was simple: the British W Force would retreat down the Greek spine, with small detachments fighting rearguard actions as the main force and logistical corps went ahead. The main course of this retreat in the central part of the country was over the Aliakmon line, a series of passes that runs from east to west.
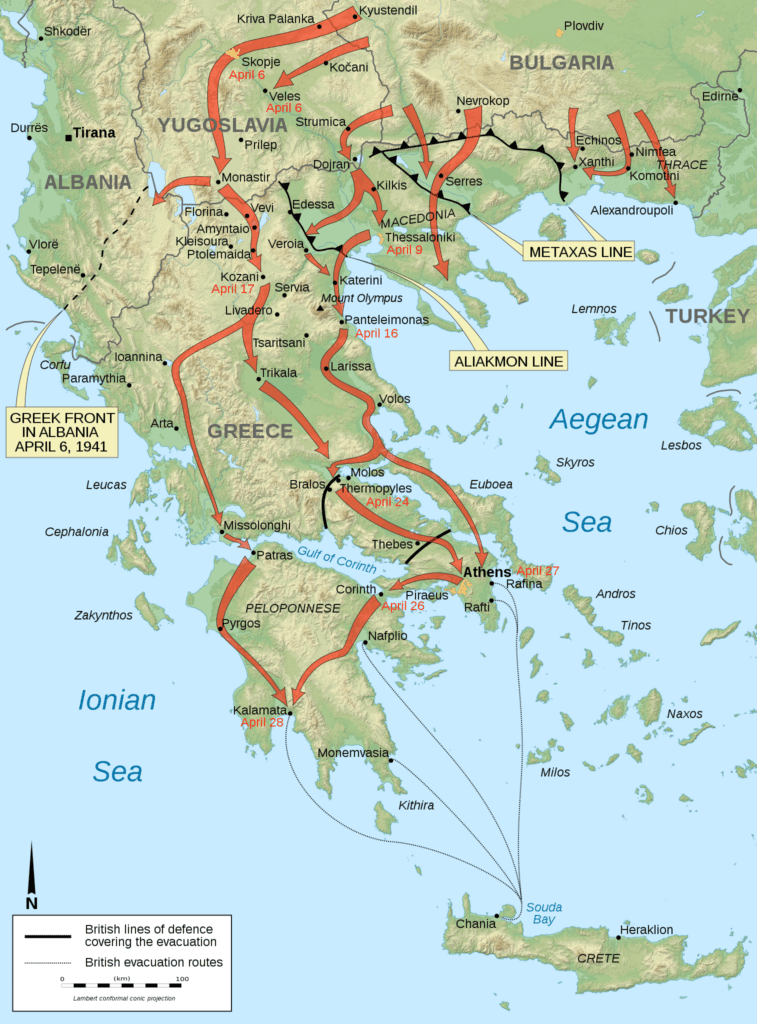
In this stage of the retreat, the main allied objective was to hold the Germans away from the town of Larisa, which was a hub of roads and rail for that part of Greece, as well as a natural chokepoint situated between the mountains and the sea. If the Germans were to capture it, any troops north of it faced almost certain capture; the only way out would be a hard foot trek across the central Greek mountain range.
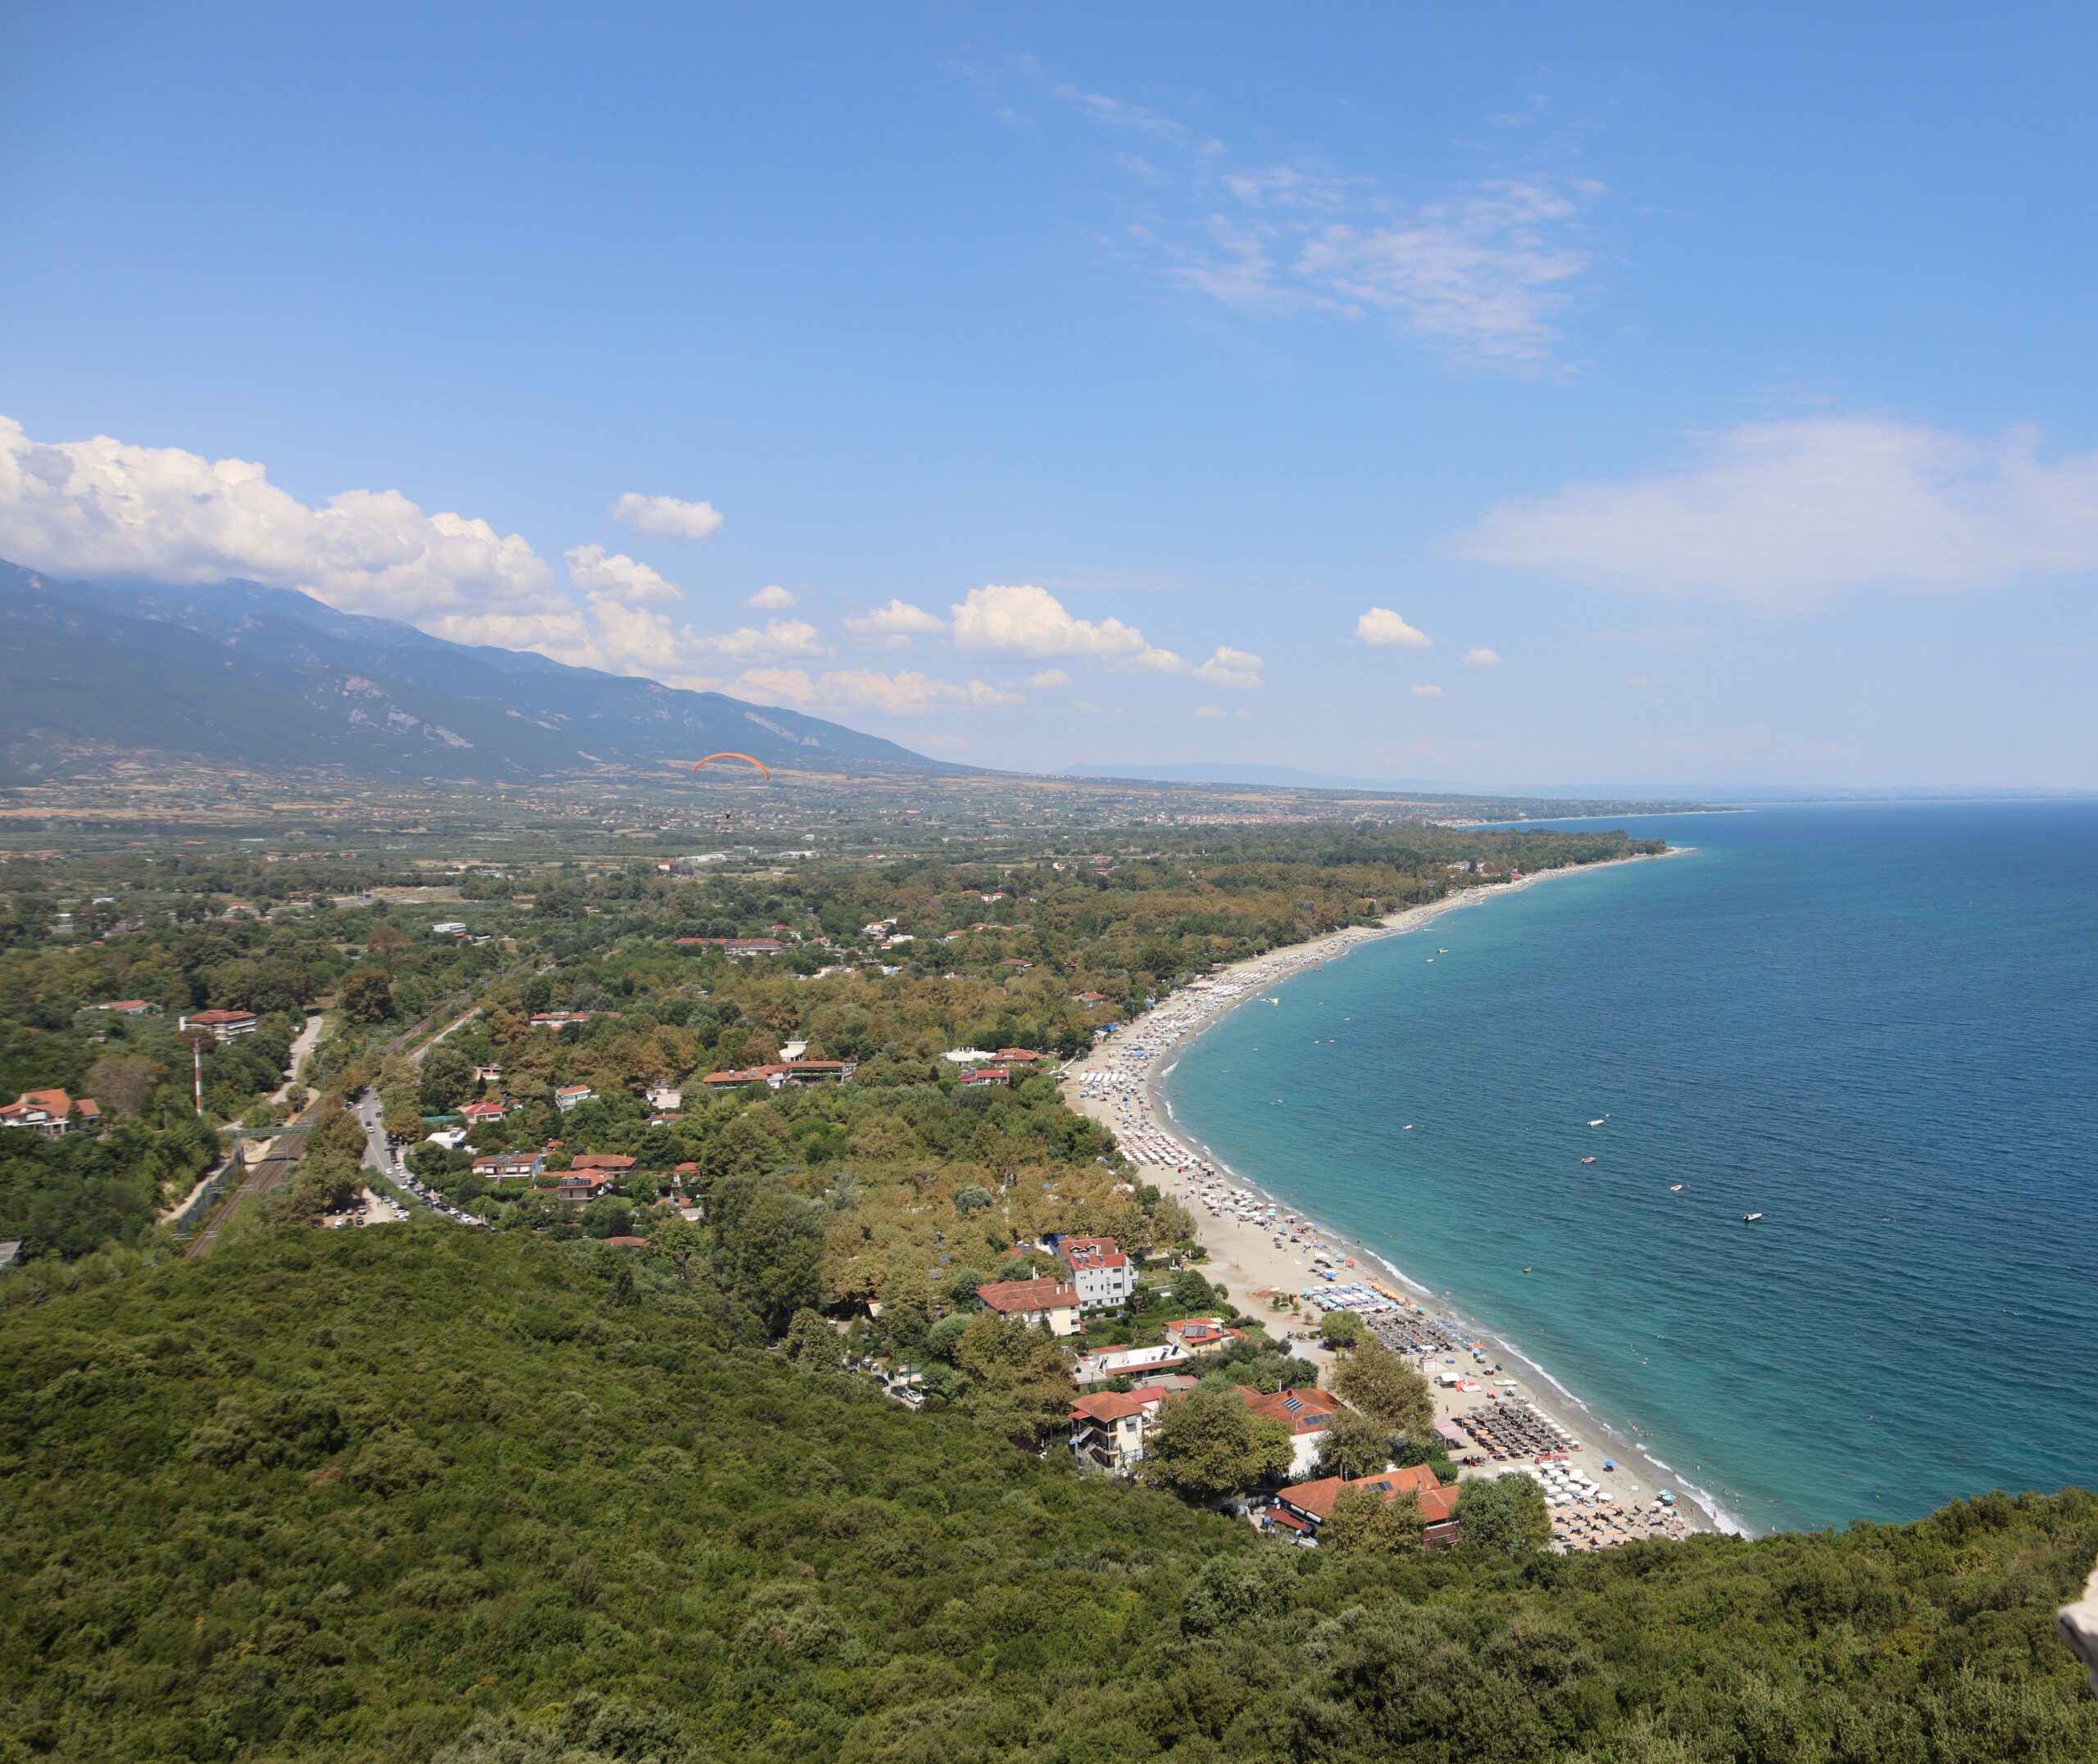
Protecting the northern approach to Larisa was the Pinios Gorge, a defile formed by the Pinios river. To scholars, the area is known as the Vale of Tempe. The area was considered by the ancient Greeks as a place to defend their homeland from Persian invaders, but quickly discarded in favour of Thermopylae a few miles to the south. The hoplite commanders apparently figured out that if an enemy force was able to capture any of the villages in the hills, a defending force in the gorge below would be easy prey.
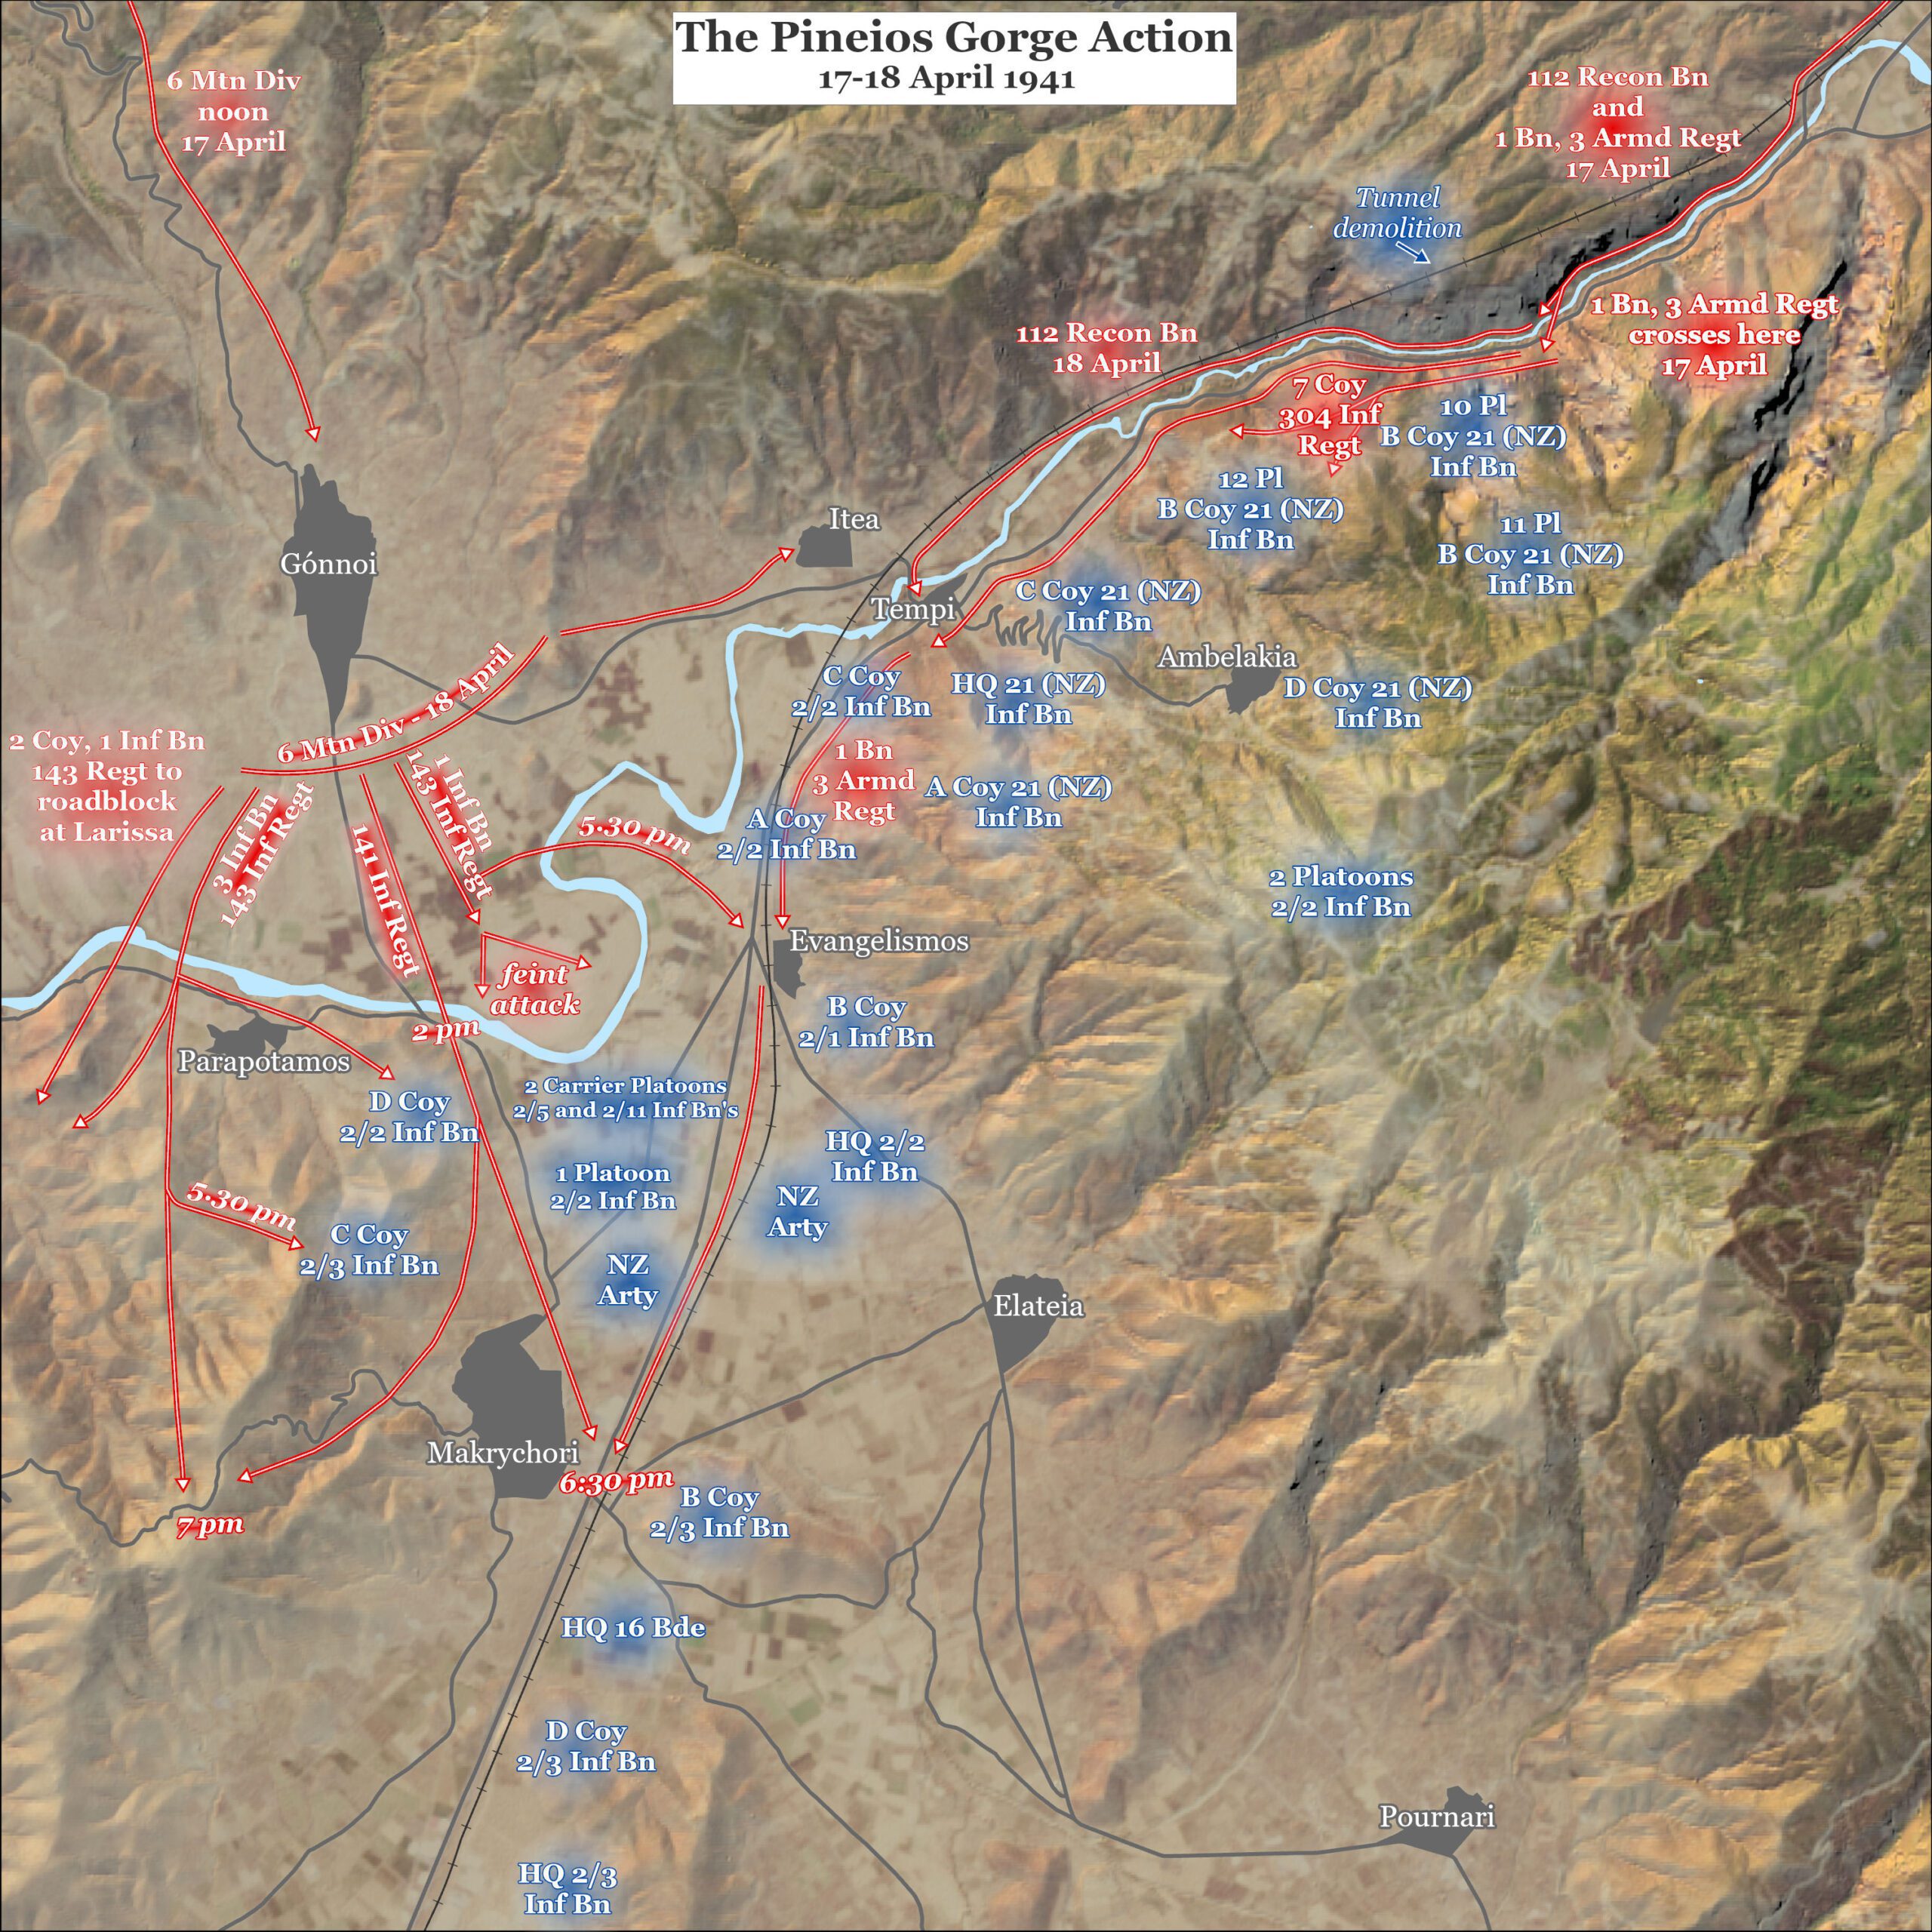
The defence of the Gorge would fall to Brigadier Allen and 16th Australian Brigade, minus the 2/1st Battalion, which was made up for by the 21st New Zealand Battalion. This gave him an eclectic force to defend Pinios Gorge with. Across from him were another mix of units, made up of tanks from the German 2nd Armoured Division as well as the 6th Mountain Division – a tough unit of mountain-trained troops that would prove a perfect fit for the terrain.
The Battle Opens
The Battle for Pinios Gorge took place on 17th and 18th April 1941, but preparations started the night before, as Anzac elements under Brigadier Allen arrived in the valley. The initial positions were set by the 21st New Zealand Battalion, commanded by Colonel Macky, but soon joined by the Australian 2/2nd Battalion under Chilton.
Like the ancient Greeks before them, the allied commanders quickly figured out that any position blocking the gorge could be fairly easily outflanked by any enemy clever enough to take the hillside villages from the south. However, unlike the ancient Greeks, in this case withdrawal wasn’t an option. If the Germans weren’t delayed at Pinios Gorge, the entire W Force could end up captured.
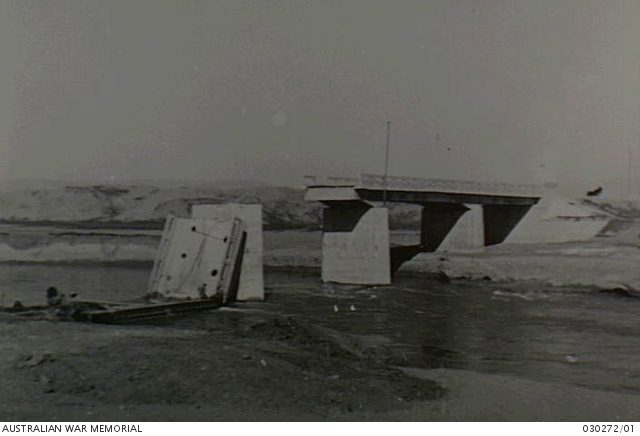
As the name suggests, the Pinios Gorge is formed by the Pinios river, which in places is fairly narrow and deep, in others widens and is fairly shallow. The railroad to Larisa ran on the northern bank, while the road was on the south. Upon arrival, Macky started work setting up positions in the hills and villages to the south, covering the road and railway with anti-tank guns. He also placed a company in the gorge itself, creating a roadblock and had sappers collapse a railway tunnel to deny German access.
When Chilton arrived around dusk on the 16th, Macky suggested that the entire force in the gorge would be placed under his command, likely because he knew the terrain relatively well. Chilton refused, which in light of future events was the right decision. Though it’s unclear what exactly transpired between the two men, we do know that Chilton’s Australian force took the low hills around the western exit to the gorge. The force was braced for an attack from the east, though still, as we would see later, vulnerable to an attack from the south and the northeast.
Planning a visit to this battlefield?
Fill in the form below and a History Guild volunteer can provide you with advice and assistance to plan your trip.
The First Day
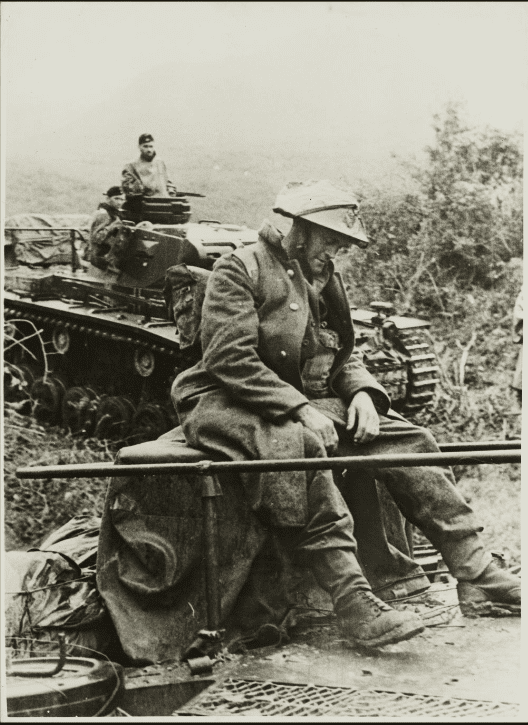
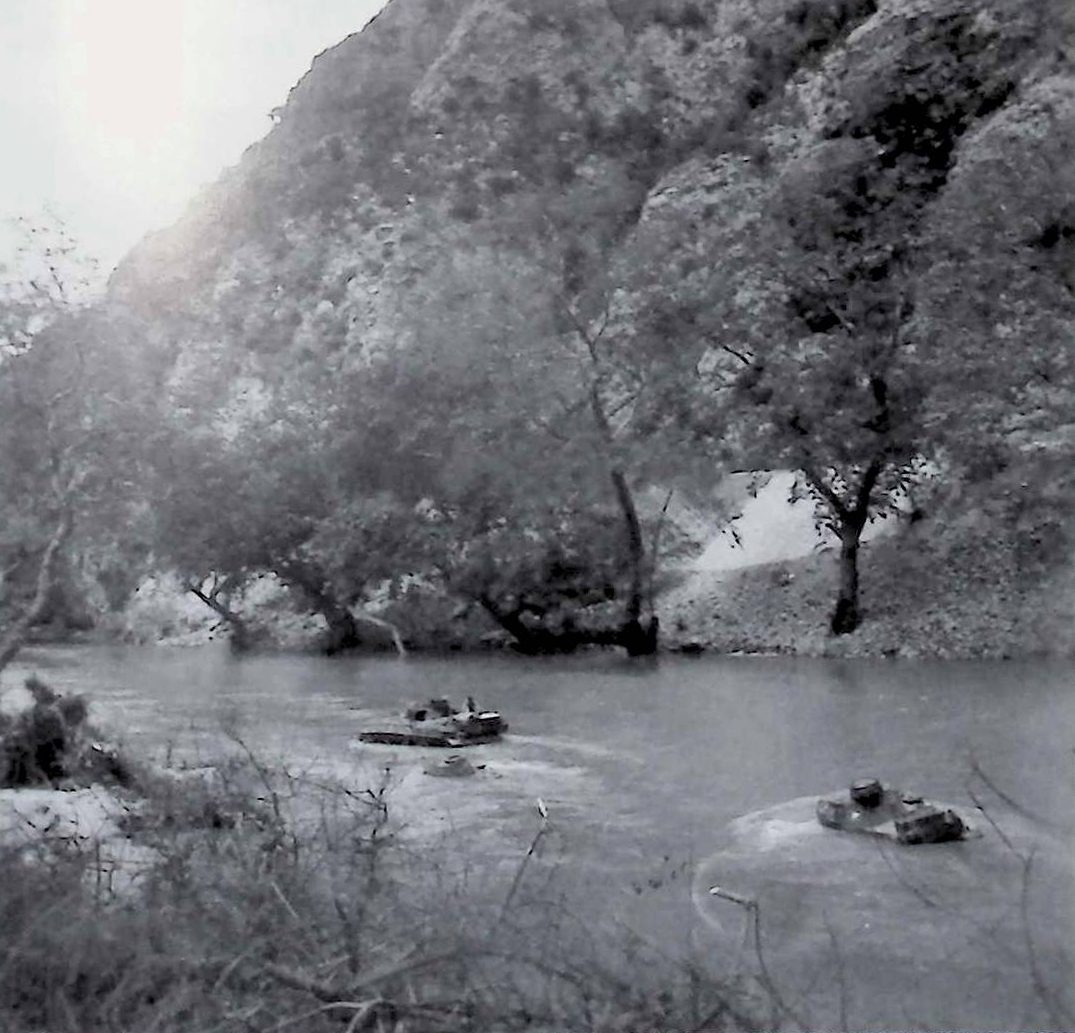
As the troops were setting up on the 17th, German armour of the 2nd Panzer Division under Colonel von Decker was making its way over the railway tracks north of the river. However, they were stymied by the collapsed railway tunnel. This unit was very experienced and saw fierce fighting on the Dunkirk perimeter a year before.
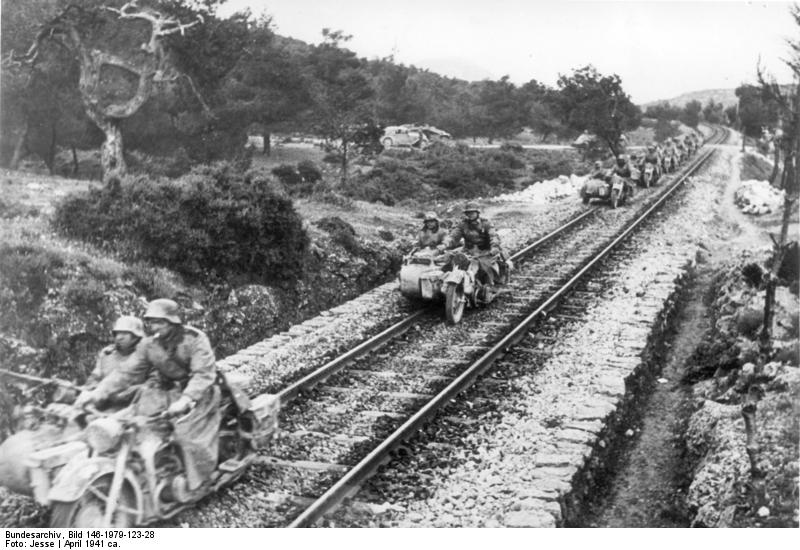
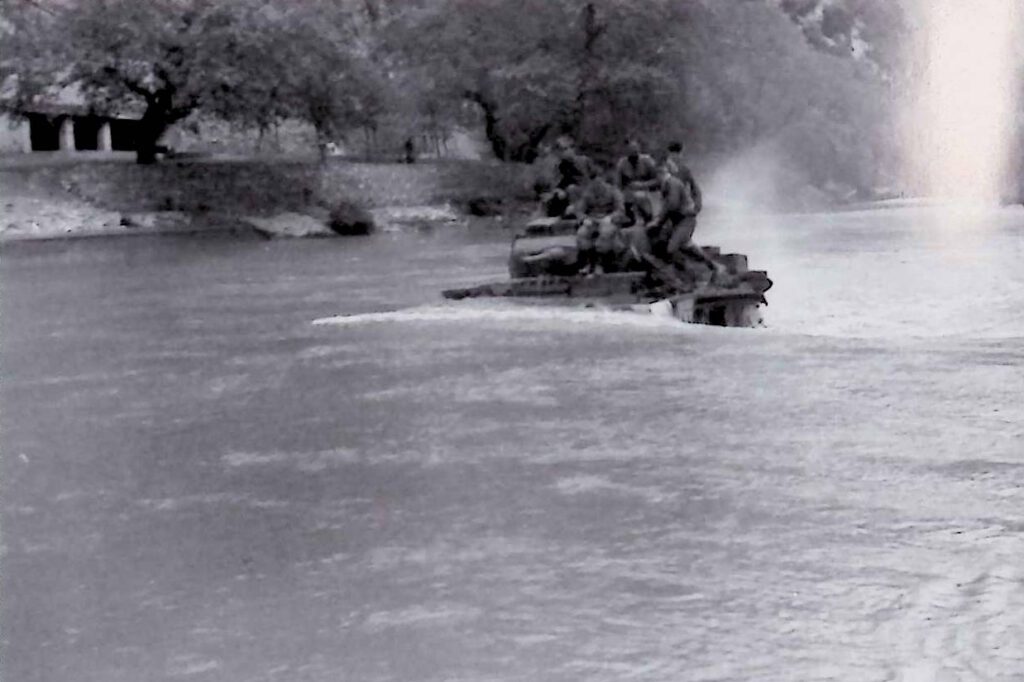
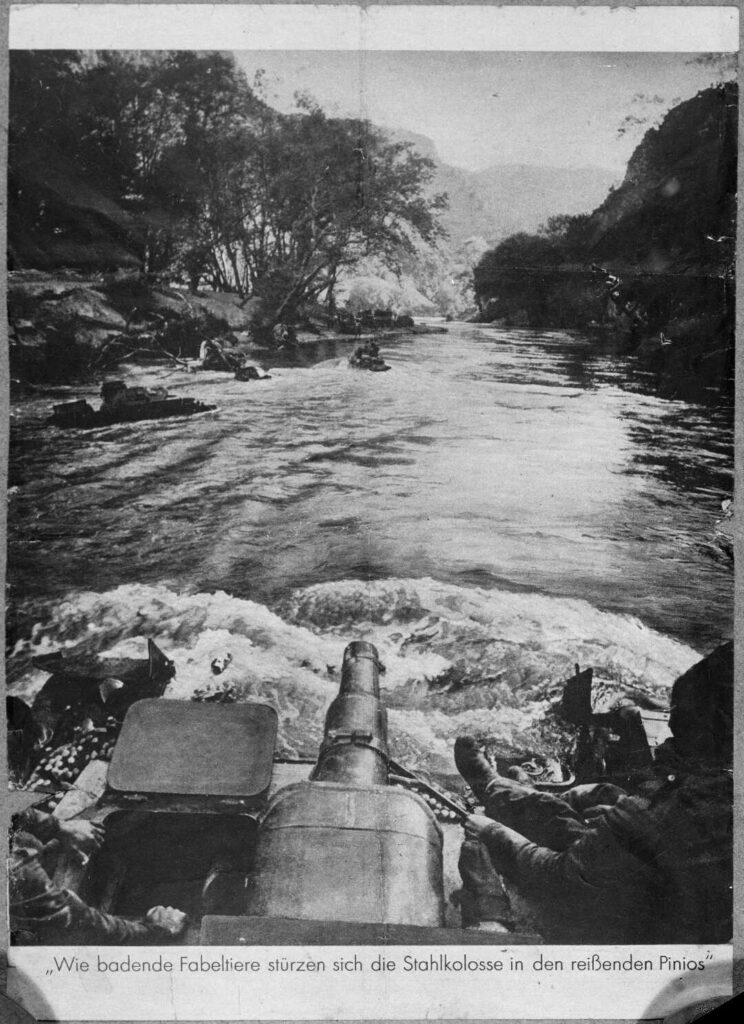
Macky’s sappers forced Decker’s tanks to use the road on the southern bank of the river. The Pinios’ depth meant fording the river was out of the question, leaving ‘swimming’ the tanks as the only option. Four tanks were able to cross, but two sank. The remainder of Decker’s tanks tried to bypass the block by going north, but got stuck in swampy ground, meaning they wouldn’t join the battle until later.


Decker, in his frustration, did force some action by having his bicycle-mounted scouts move ahead to see where the Anzacs were. They made contact with the roadblock set up by the New Zealanders in the late afternoon of the 17th. The scouts fired some potshots, while the New Zealanders replied with a few bursts of machine gun fire. With no real cover, the German scouts quickly retreated.
Shortly after, though, one of the tanks that had swum the river was able to make enough progress to set its sights on the roadblock, opening fire. Without anti-tank capability, the New Zealanders pulled back, ceding the road to the Germans.
It’s unclear whether Chilton knew any of this happened. What we do know is that on nightfall, he sent a platoon to patrol the road up toward the roadblock. When they arrived, however, they found the Germans in strength and they were immediately pinned down. Chilton made several calls to Macky for assistance, but got no answer. The end result was that the Australians were able to beat a retreat, but not without leaving a number dead on the field.
Chilton’s response, not hearing from Macky, was to call in artillery strikes on the position of the now former roadblock. This dispersed this group, but worse was yet to come: reports had come in that the Germans had managed to take control of several villages in the surrounding highlands, most importantly Gonnoi and Rapsani and, disastrously, Ambelakia, which gave the enemy a flanking position.
Artillery was again used as a deterrent, and managed to send the Germans scurrying for cover, even causing some casualties among the troops in Gonnoi. However, it would only delay the inevitable.
The Second Day
April 18th started with a two-pronged German attack. The enemy plan was to start with a feint from Gonnoi in the southeast early in the morning, and then followed up with a genuine attack from the west an hour or so later. The aim was to overwhelm the allied troops and gain control of the gorge, and the road to Larisa, as quickly as possible.
The Australians were able to hold the feint back quite easily, shelling and machine gunning the approaching Germans until they were stopped by the river, which they were not able to cross. Chilton even claimed the morning was a success, not realising that the real attack was yet to come.
German troops had left early in the morning and after a forced march had taken the village of Parapotamos. Australian units there were taking heavy fire and started a retreat, which quickly turned into a rout. The Germans pressed on and were able to bring their artillery to bear against Chilton’s left-most positions, pinning them down and demoralising them.
Seeing how successful the push was, The German commander ordered an all-out assault aiming to clear the gorge so the armoured elements could go through. The feint was transformed into a full attack, meant to create a beachhead at all costs. Despite many German soldiers not being able to swim, and the hail of machine gun and artillery fire aimed at them, the troops somehow managed to get across and establish a position, though it cost the lives of many men. Eyewitnesses reported a river of blood.
Macky Loses His Nerve
As the Australians were losing their grip on the situation, the New Zealanders weren’t doing much better. The German thrust on their position had proven remarkably successful, and the New Zealanders had broken on sight of the panzers bearing down on them. This was likely due to the fact that the Boys anti-tank rifle — the main weapon for infantry to use against German armour — was near useless. The round would just bounce off.

Macky was unable to calm the troops down — reports have him being in a “blue funk” after several days of retreat, facing tanks and losing — and soon his troops were streaming down the hillsides and toward Larisa. In the end, only one platoon managed to regroup and report to Chilton.
What made it worse was that Allen and Chilton had no idea any of this was happening as Macky did not tell them anything, besides a final message confirming his withdrawal. One moment the Australians were pinning down the German attack, the next their camp was being overrun by soldiers in New Zealand uniforms. Unsurprisingly, this rattled the defending Australians, proving a blow to morale. Worse yet, Macky’s troops included the much-needed anti-tank guns, which now left for Larisa without firing a shot.
The result was that by about 15:00 on the 18th, things were looking grim for Chilton. The enemy was coming at the Australians from all sides, and was bringing armour with them. Fire started raining down, and the situation was getting more tense by the minute. Communications suffered, too, and a platoon on the left flank withdrew prematurely thanks to a scrambled order, making the line even weaker.
Meanwhile, at headquarters a few miles down the road, Allen was getting ready to make his own dash to the south. He ordered Chilton to stay put until 03:00, not realising that might be too much to ask. Shortly after that, though, telephone lines broke down completely and a messenger couldn’t get through, either.
Even in the face of all this, though, the Australian troops kept on fighting and delayed the Germans best they could. Still, there were simply too many Germans, especially when the tanks joined the fray. Not only did they bring their own superior firepower, they also were dragging sleds of infantrymen, who could join the fight. As night fell, German troops were taking shots at the Australians from the front, left, and even from the former New Zealand positions. One battalion was even about to encircle Chilton and his men. At about 18:00, two dozen tanks finally broke free of the gorge, bypassed the defences, and made it onto the Larisa road. The only thing between it and the retreating main part of W Force was a small contingent at Allen’s HQ. Faced with tanks and infantry converging, as darkness came, Chilton ordered the retreat; there was no way he could hold till 03:00. His battalion scattered in the dark, with some of them able to take a ship a few weeks later to Alexandria. Other than that, there wasn’t much left of his force except for his own detachment and a handful of stragglers.
The Third Day
As midnight came and the 19th started, Allen was in bad shape. The road down to Larisa was reserved until 01:00, when the last parts of W Force were scheduled to go, but Allen had only a handful of soldiers left to defend the road, and a large force of Germans barrelling down toward him.
Having planned for such an eventuality, he had picked several spots on the way to Larisa where temporary defences could be placed to further delay the Germans. One such spot was about 10 kilometres from Tempi, where he had ordered Colonel Lamb to hold, and make sure to stop any large gun from retreating; with German armour on the way, they knew they needed every big gun they could get their hands on.
As the night wore on, Lamb’s small force grew as it scooped up retreating forces. By the time day broke, his forces numbered a fair few Australians and New Zealanders, plus some heavier guns.

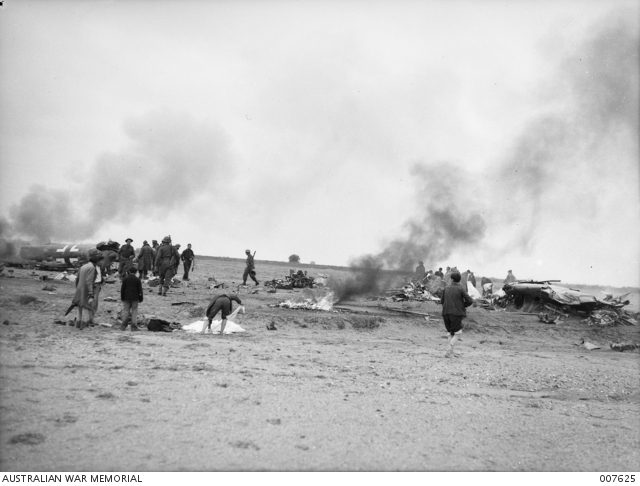
At around 06:30, five German tanks reached the first fallback line. Two of the tanks were taken out by field guns before they themselves were destroyed, but the remaining three simply drove through the Anzac forces. A few infantrymen surrounded one and poured small arms fire into it, but to no effect, and two men were crushed to death by the tanks before they broke free and continued down the road, trying to catch up with the main part of W Force.
Lamb retreated about a kilometre before setting up another line just in time to greet the tanks again. This time, though, the small arms fire proved more effective, killing a German tank commander who had decided to take a look outside of his turret.
However, night was falling, and the confusion caused by the encroaching darkness, plus the ongoing gunfire, including tracers, seemed to make the German advance stall; it simply ran out of steam as the oncoming infantry seemed preoccupied with clearing out the surrounding hills rather than further advance down the Larisa road.
It turned out that, though, that it wasn’t the pursuing Germans that would be the biggest issue for Allen, but rather the ones in front of him.
Ambush
A day earlier, the German commander had decided to march a mountain troop company along the left flank of the retreating Australians and New Zealanders, ending up ahead of them just five kilometres north of Larisa. Nobody among the allies expected such a move, mainly because it was near-impossible. It’s a hard day’s march under any circumstance, and over tough terrain. Carrying heavy equipment, it must have been gruelling.
The troops set up an ambush, which was successful beyond belief: the first prey to fall victim were some of Allen’s ammunition trucks, which were captured and driven off. A few hours later, the rest of Allen’s retreating troops showed up, and this time, when the ambushers engaged the leading lorry, chaos erupted.
The troops further down the road, hearing gunfire, panicked as they assumed it meant Larisa had fallen. For years, many descriptions of the fighting in Greece would report that Larisa fell to the Germans on the 18th because of this, despite this not happening until a day later.
Many of the men who fell victim to the ambush scattered, fleeing into the hills, often ending up captured or not rejoining the army until months later in Egypt or other parts of the Middle East. Less than a thousand would rejoin Allen’s force as it regrouped to defend Thermopylae a few days later.
Interactive Map of the Battle of Pinios Gorge
The Aftermath
The battle of Pinios Gorge was a vital part of the defence of Greece. The brave men of the Anzac brigades were able to hold off the Germans long enough for the main part of W Force to retreat further south, while also preserving enough troops to stage the next part of this relay defence, at Thermopylae.
The battle held many lessons for the allies. For one, it became ever more clear that a real anti-tank weapon needed to be developed to replace the ineffective Boys anti-tank rifle. Throughout the Greek campaign, soldiers would break out in panic when faced with the metal behemoths; having a weapon that could beat them could have prevented a rout like that of Macky’s New Zealanders.
Another was to never underestimate the Germans’ mountain troops. Recruited from Germany and Austria’s many mountainous areas, these men were born and bred to withstand the punishing terrain. Add to that some of the toughest training out there — something which lasts to this day — and they were a force to be reckoned. Few units could have managed the hard march that so surprised Allen, and the Germans had brought several companies of them to Greece.
In the days that followed, W Force made it even further south, and a mad dash over the plains of Thessaly. Many elements of the 2/1st and 2/2nd Battalions went with them, though plenty more would find themselves either captured or wandering the mountains of central Greece, hoping to be rescued. Many would find the local Greeks helpful, feeding and hiding them until a ship came to pick them up, or they made their own way back to Allied lines.
Australian Units who Fought in the Battle
2/1st Australian Infantry Battalion
2/2nd Australian Infantry Battalion
2/3rd Australian Infantry Battalion
2/5th Australian Infantry Battalion
2/11th Australian Infantry Battalion
2/1st, 2/2nd and 2/3rd Australian Field Regiments and 2/1st Anti-Tank Regiment
Podcasts about Australians in the Mediterranean during WWII
Did my Relative Serve in these Battles?
Hundreds of thousands of Australians served in the Mediterranean during the Second World War. Some families know what their relative experienced during this often very important part of their life, but many do not. History Guild has a project where our volunteers research the service history of Australians who served in the Mediterranean. We have had a lot of interest in this service and have a large backlog of research to get through, so it currently closed to new entries.
We hope to re-open this service once we have finished our research on the current set of Australian servicemen and servicewomen.
The text of this article was commissioned by History Guild as part of our work to improve historical literacy. If you would like to reproduce it please get in touch via this form.