Reading time: 8 minutes
For a fine example of overconfidence during the height of British Imperialism, look no further than the Anglo-Zulu War. Fought in the late 19th century after the invasion of Zululand, the British Empire faced a far greater challenge than anticipated, resulting in what has been dubbed one of the bloodiest wars of the period.
During the most notorious battle, the Battle of Isandlwana, British forces suffered a decisive defeat at the hands of the Zulu army. Another, the Battle of Rorke’s Drift, garnered more attention due to the surprising victory of a small British force against a large Zulu force. The course of the war and the revolutionary tactics used make it one of the most dramatic in British and Zulu history, and military history as a whole.
By Madison Moulton
The Lead-Up to the Anglo-Zulu War
Historians still disagree as to when the war actually started, with dates ranging from 10 January to 22 January 1879. What is certain though, is that the British ambitious Policy of Confederation is what sparked the war. The Policy of Confederation set out to unify all groups in the Southern African region under British control. This included various British colonies, independent African groups, and Boer (Afrikaaner) republics.
The strong Zulu Kingdom was well-armed and organized, especially under King Cetshwayo. It was seen as a true threat to the Policy of Confederation and its goals. Ultimately, the policy could not succeed until the independent Zulu Nation was dismantled.
The years of border disputes between rulers of the Transvaal (first the Boers, followed by the British) and the Zulu Kingdom gave imperial powers the perfect excuse to put forward an ultimatum. It demanded the dismantling of the Zulu military forces and the halting of any military operations. It also required the presence of a British Agent to ensure all terms were carried out, effectively stripping King Cetshwayo of control. The ultimatum was handed to Zulu representatives on 11 December 1878, at what became known as the Ultimatum Tree on the banks of the Thukela River. King Cetswayo was given until January 10th to sign the ultimatum. With terms the King was unable to agree to, the first invasion of Zululand subsequently began on 11 January 1879.

The Battle of Isandlwana
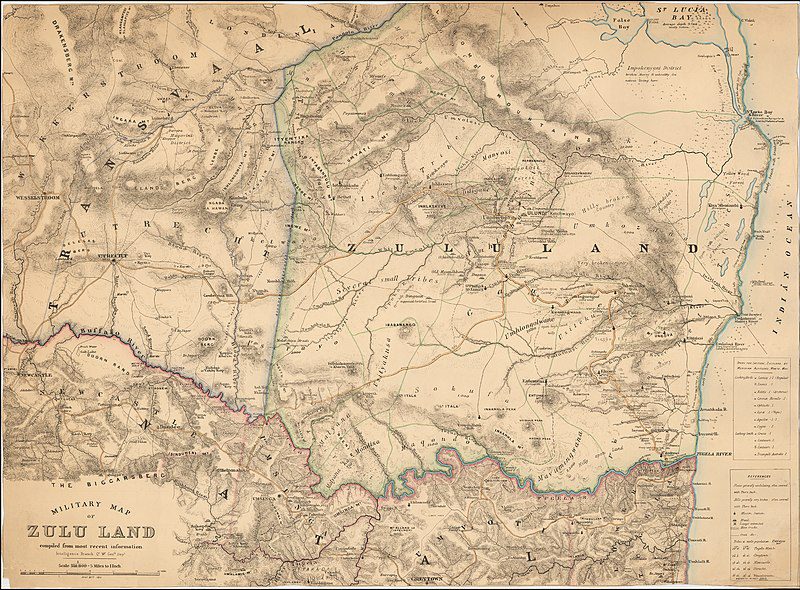
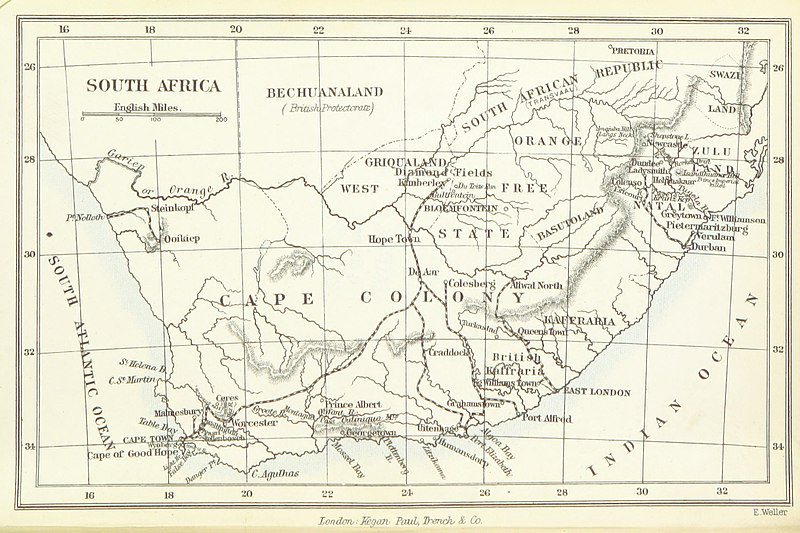
The goal of the invasion was to occupy the Zulu royal kraal (fortified homestead) in Ulundi. The British forces were made up of 18 000 men, including members of the imperial forces, colonial volunteers, and members of Natal Native Contingent. Taking strategic notes from Zulu military operations, this was to be achieved by advancing on Ulundi from various directions. Much like the Zulu’s Buffalo Horn Tactics, this split British forces into columns, each tasked with a specific objective.
The first column set out to cross the Tugela and Eshowe rivers on their way to Ulundi. The Number 3 Column, considered the centre or main force, moved through what is now known as Pietermaritzburg. This centre force aimed to enter Ulundi via Rorke’s Drift. The Number 4 Column aimed to move into Ulundi from the northwest, via Utrecht.
These three main groups were accompanied by two smaller columns. The first of this group, Number 2 Column stationed at Krantzklop, was to stop the Zulu forces from crossing the Tugela River. Number 5 Column was situated at Luneberg, protecting the Transvaal.
The centre Number 3 Column saw its first battle on 12 January when they attacked and destroyed Sihayo’s Kraal. However, many historians argue that the true start of the war – the first major battle – was the Battle of Isandlwana.
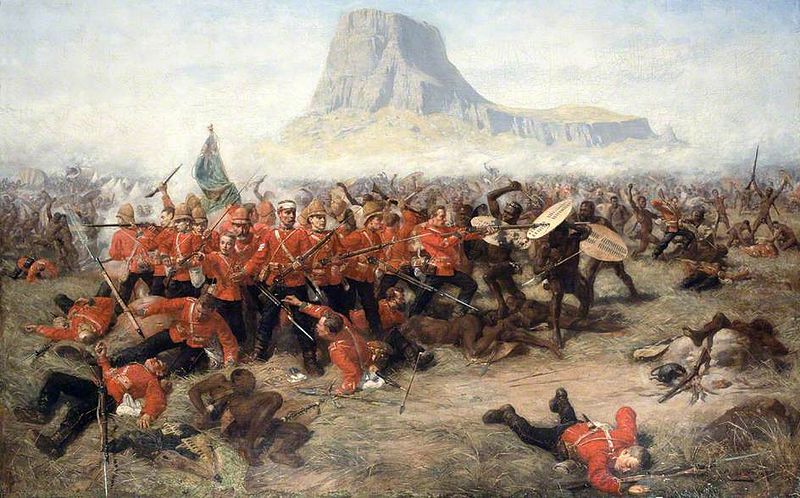
From Sihayo’s Kraal, the Number 3 Column moved toward Isandlwana, reaching it on the 20th of January. At this point Lord Chelmsford split his forces in half, leaving 1,800 soldiers at Isandlwana and leading 2,800 to attempt to find and engage the Zulu army in battle. Chelmsford ignored his own standing orders by failing to create any defensive positions, entrenchments or even laager his wagons at Isandlwana. These mistakes stem from Chelmsford’s greatest failure – his underestimation of the Zulu Army.
On the 22nd, the main Zulu force, approximately 25,000 men strong, arrived near Isandlwana. They had outmanoeuvred Chelmsford’s 2,800 soldiers, who were several miles away. The main Zulu force was discovered at around 11:00am by men of Lt. Charles Raw’s troop of scouts, who chased a number of Zulus into a valley which contained 20,000 men of the main Zulu force. Having been discovered the Zulu’s swung into the attack, the warriors’ training allowed the Zulu troops to form their standard attack formation on the run, with their battle line deployed in reverse of its intended order.
In their Buffalo Horn formation, the Zulu’s attacked the camp. The centre group of the Zulu army, known as the chest, focused on the left flank of the camp. Disciplined British volleys pinned down the Zulu centre, inflicting many casualties and causing the advance to stall. British morale remained high, their Martini–Henry rifles could maintain a rate of fire of 10 to 12 rounds per minute. They also had artillery support, which forced some Zulu regiments to take cover behind the reverse slope of a hill.
However, the left horn of the Zulu advance was moving unseen to outflank and envelop the British right. Around an hour into the battle the British fire began to slow as some of their units ran low on ammunition. The Zulu forces swept through the British camp as the defensive line collapsed. Many of the disciplined British units formed Infantry Squares, as they were now surrounded. They died where they stood, overwhelmed by the Zulu warriors.
Numerous messages, some quite early in the day, had been sent to Chelmsford informing him of the attack requesting the return of him and his 2,800 soldiers. Chelmsford failed to respond to these increasingly urgent pleas for help. The most egregious failure to respond occurred at around 1:30 pm when a message from Hamilton-Browne stated, “For God’s sake come back, the camp is surrounded, and things I fear are going badly”. Chelmsford was only convinced of the seriousness of the situation hours after the camp had been taken by the Zulus.

Many British troops fled to Rorke’s Drift, while others were pushed further away, down the Mzinyathi River. Over 1,300 of the 1,800 British soldiers died, of the 57 British officers only 5 survived.
The British investigation of the battle concluded that the primary cause of the defeat was the “under estimate formed of the offensive fighting power of the Zulu army”, additionally the investigation questions Chelmsford as to why the camp was not laagered and why there was a failure to reconnoitre and discover the nearby Zulu army.
The Battle of Rorke’s Drift
During the events leading up to the Anglo-Zulu war, Rorke’s Drift had been set up as a supply depot and hospital. Following news of the Battle of Isandlwana, defensive measures were put in place. Rorke’s Drift was guarded by around 400 men.
The Battle of Rorke’s Drift, also known as The Defense of Rorke’s Drift, took place on January 23rd. Following the success of the previous day’s battle, 4,000 Zulu soldiers of the reserve forces, also known as the Lions, attacked Rorke’s Drift. Armed with their traditional spears and cowhide shields, they forged ahead.
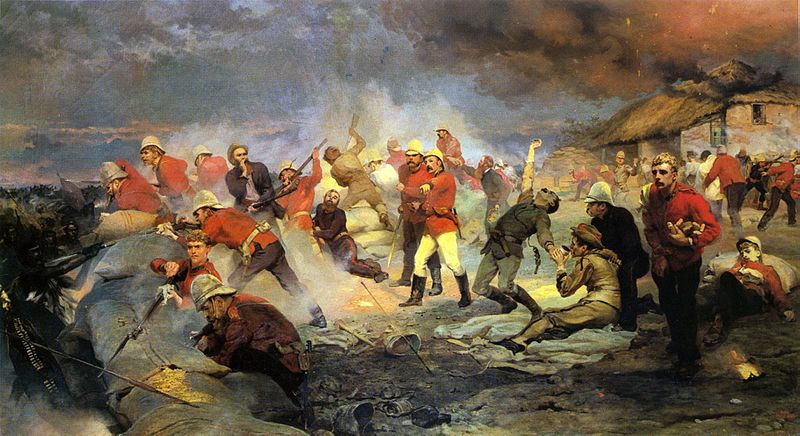
Maintaining their defenses, British troops kept the Zulu forces back with constant rifle fire and bayonets. Few men were available to defend the hospital and the patients therein, but by moving from room to room and maintaining gunfire, they were able to save many patients with few casualties. Following hours of engagement, the remaining Zulu forces retreated.
The battles of Isandlwana and Rorke’s Drift were the first two decisive battles of the Anglo-Zulu war. They set the tone for the rest of the war which would last until July 1879. The Zulu success at the Battle of Isandlwana showcased the strength of the Zulu nation and army as well as the overconfidence of the Imperial forces under Lord Chelmsford. But Zulu success was short-lived, their defeat at Rorke’s Drift the first of many. By March, reinforcements arrived to aid the Imperial army. Several battles and skirmishes ensued, the last being the Battle of Ulundi. The British forces defeated the Zulu army, ultimately ending the war and Zulu control over the region.
Africa’s World War: The Congo War
Reading time: 5 minutes
5.4 million people died in the deadliest war in modern African history. Yet, the event remains overlooked and understudied. A spill over war resulting from the Rwandan Genocide, fighting continued between the Hutu and Tutsi people, backed by Uganda. The First and Second Congo Wars caused the largest loss of life that has occurred since World War 2.
How The Napoleonic Wars Entrenched British Rule In 19th Century South Africa
The battles between Britain and France following the French Revolution and into the Napoleonic Wars had far-reaching effects, not only in Europe, but across the globe. Caught in the crossfire at the tip of Africa was the Cape Colony. By Madison Moulton As a stop-off on the route to India, the Cape Colony had been […]

The Bantu Expansion: How Bantu People Changed Sub-Saharan Africa
Reading time: 4 minutes
About 3500 years ago, an event began that changed the demographic, linguistic, and cultural makeup of the African continent forever. It is described as one of the most momentous events in African history. It has sparked speculation, debate, and curiosity among scholars within the continent and beyond. Unfortunately, it is also greatly understudied and often unknown to history enthusiasts.
