Reading time: 5 minutes

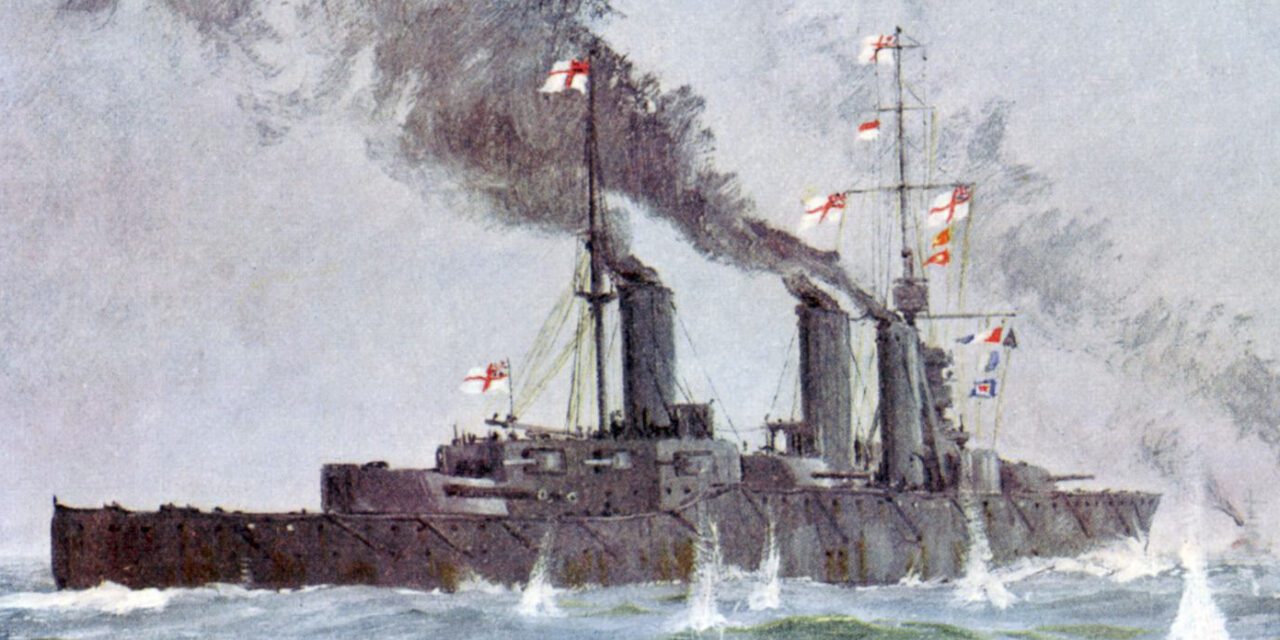
One of the Great War’s abiding myths is that the German High Sea Fleet never emerged again after the Battle of Jutland to face the Grand Fleet until the ignominious internment of its major units in November 1918. In reality, the Germans mounted another operation before the summer of 1916 had ended. As soon as enough ships were repaired, the fleet’s commander, Admiral Scheer, once more attempted to reduce the British strength.
What occurred was arguably even more significant in its strategic results than Jutland itself. Furthermore, the operations of 18–19 August 1916, in which the main forces of either side never saw each other and in which events were determined by the reports of airborne scouts and attacks by submerged submarines, were a better forecast of the future of sea warfare than the broadsides of Jutland.
The German First Scouting Group intended to bombard Sunderland on England’s east coast, supported by the battle squadrons of the High Sea Fleet. Scheer hoped that this would draw British forces into U-Boat traps. He’d been disappointed by his submarines’ failure, positioned outside British ports, to conduct successful attacks on Grand Fleet units either before or after Jutland. Assessing that the need to keep the boats well separated in their patrol areas had contributed, he decided to deploy multiple U-Boat lines across the expected British lines of advance and withdrawal, lines which he could reposition by having their flotilla commander available with access to powerful radios in a main force battleship. Scheer was also intent on using zeppelins to detect and report the enemy fleet. Their ability to see at much greater distances than surface ships would give him the chance of isolating a weaker British formation, and avoiding a stronger one.
Unknown to the Germans, the British were continuing to intercept their radio signals. Thus, as at Jutland, the British found out about the sortie and had their ships at sea several hours earlier than the High Sea Fleet. There were, however, key differences to the Jutland action. The British this time sailed the cruisers and destroyers of the Harwich Force, while additional submarines were despatched to supplement the usual patrols around the Heligoland Bight. The battle cruisers under Admiral Beatty were kept much closer to the Grand Fleet and there was similar caution with the German forces.
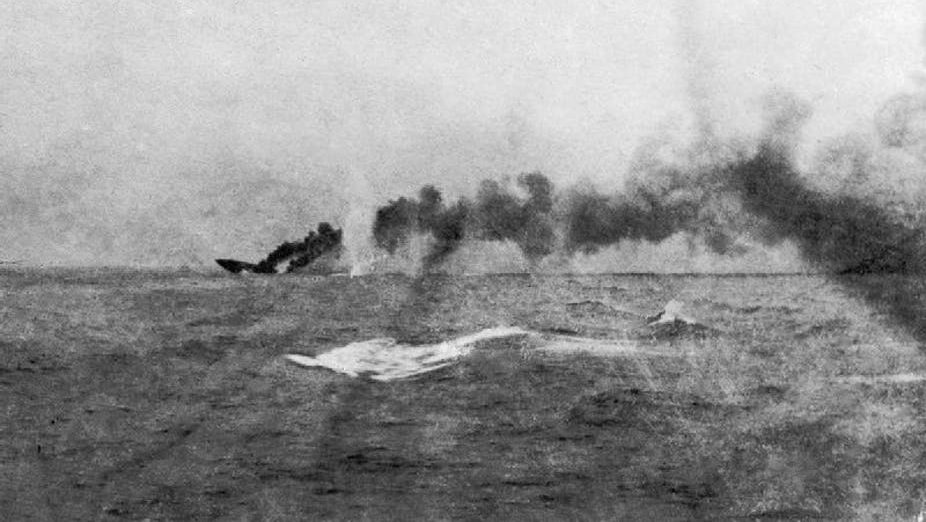
What followed as the British advanced from the north-west and south-west and the Germans from the south-east reflected the continuing challenges of the new technology and the problems of decision-making in uncertainty. The British were shocked by the loss of two light cruisers to U-Boat torpedoes. What concerned them was that those relatively small and manoeuvrable ships had been steaming at high speed—one at 23 knots—and zigzagging. Bigger ships, including the battle cruiser HMAS Australia, experienced near-misses. The Germans suffered as well. The battleship Westfalen was damaged by a torpedo from the submarine E-23. Submarine capabilities and skills had improved significantly since 1914.
Fear of what might be ahead caused the British C-in-C, Admiral Jellicoe, to halt his movement south for a time. That contributed to the failure of the fleets to meet, but more significant was a mistaken zeppelin report which made Admiral Scheer think that the light craft of the Harwich Force were a detachment of capital ships, exactly the target that he wanted to isolate and destroy. Too much time spent on bombing operations over England meant that the zeppelin crews lacked the necessary expertise in identifying ships on the surface. Scheer turned towards the Harwich Force at a critical moment—continuing on his previous course for little more than an hour would have put the Grand Fleet between his ships and Germany. Realising that he was on a false trail and alerted by a U-Boat as to the Grand Fleet’s approach, Scheer turned for home. He was followed by the Harwich Force, but the British were unwilling to attempt an attack on a moonlit night, against an alerted (and expert) enemy and with the disadvantage of a stern-chase. A few hours later, the German fleet was safe inside the inner Heligoland Bight.
Jellicoe, concerned by his ships’ vulnerability and the shortage of destroyers to protect capital ships and cruisers, decided that he would not venture into the southern North Sea except in the most favourable circumstances. Scheer, although still considering ‘combined arms’ ideas for attacking the Grand Fleet, was by now convinced that the best German option was an unrestricted campaign against merchant shipping. If this resumed, there would not be enough U-Boats available to support the main fleet. He intended another sortie in October 1916, but events overtook him and renewal of the unrestricted campaign in February 1917 forced the High Sea Fleet into a coastal defence role, protecting the submarines’ access routes. Surface raids on the British would be small ‘hit and run’ affairs against coastal and offshore convoys. There were major German operations in the Baltic, but not until April 1918 would another fleet sortie be mounted in the North Sea. The war at sea had truly become a war against supply.
There were other lessons. Already practising their own airborne scouting techniques, the British threw new effort into naval aviation, both for reconnaissance and to destroy the dreaded zeppelins. Capabilities that were only a few months from entering service meant that the days of these rigid airships were numbered. The British also fitted their submarines with better radios to allow them to communicate across the North Sea—as German communications security was finally beginning to improve, this was a vital step in providing sufficient warning of their movements.
In an Australian footnote, the light cruisers Melbourne and Sydney had already been designated after Jutland as reinforcements for the Grand Fleet. The loss of their near sisters meant that they were even more welcome when they joined the Second Light Cruiser Squadron later in 1916. Over the remainder of the war, the cruisers played a leading part in the work of the Grand Fleet.
This articles was originally published in The Strategist.
Articles you may also be interested in

Scrap Iron Flotilla: The Royal Australian Navy at its Best
To the Axis Powers, the Australian flotilla that fought in the Mediterranean during the Second World War appeared to be no threat. Anyone looking at the old, small and slow destroyer group would think the same. Soon, however, the Axis and the rest of the world would learn just how formidable it was. The ‘Scrap […]
The Battle of Cape Spada: The Australian Navy Proves Its Mettle
Reading time: 9 minutes
The Battle of Cape Spada was a short, violent encounter on the 19th of July, 1940 where the cruiser HMAS Sydney of the Royal Australian Navy sank one Italian cruiser and severely damaged another off the coast of Crete. In this article, we go over the events of that day, as well as what life was like for the crew of the ship.
Jutland: Why World War I’s only sea battle was so crucial to Britain’s victory
By Andrew Lambert, King’s College London. Modern understanding of World War I is dominated by the immense human cost of the war on land with its trenches, artillery and machine guns – but the war was won by sea power. In August 1914 Britain, the greatest naval power of the age, controlled the oceans, cutting […]

