Reading time: 19 minutes
Kenneth Fredric Ward was a 22 year old stockman when he enlisted in 1939, giving his mother’s address of Seaview Avenue, Harbord, now part of the Sydney Northern Beaches suburb of Curl Curl. The locality would have been dramatically different to the exclusive beachside suburb it is today. Ken had been born in Rose Bay, on the southern side of Sydney Harbour, but had spent most of his youth in Cammeray, where he grew up and went to school. His family had then moved to the northern beaches, to a farm called ‘Windy Knoll’.
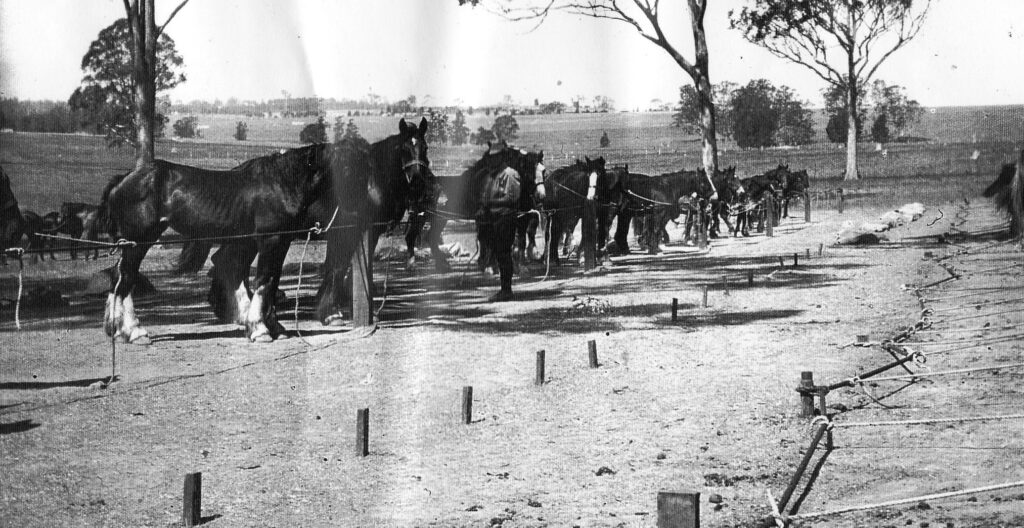
Ken left home at age 14 and pursued rural work, initially in central NSW and then in the channel country of western QLD, around the Noccundra and Bullo Downs area. When it became clear that war was likely, he and some mates rode their horses to the railhead at Bourke and travelled to Sydney to enlist.
Training, at home and away
Kenneth travelled to North Sydney to enlist in the 2/1st Battalion on the 20th of October 1939, wasting no time after war had been declared. At enlistment it was noted that he had a tattoo on his right forearm, something that was far less common than it is now. He was assigned to the 2/1st Battalion, which was formed only four days before and quickly filled with young men from Sydney and surrounding districts. They followed on from the 1st Battalion that had served in the First World War, the battalion’s unit color patch featured black over green, reminiscent of the 1st Battalions’ colors from World War I, their motto was Primus agat Primas (First Always First). Basic training was in Ingleburn, New South Wales, which saw the unit develop its cohesion and esprit de corps. This is demonstrated well by an incident involving the camp canteen, which was run by a civilian contractor who was known for high prices and low quality, and answering any complaint with abuse. The canteen caught fire and the Orderly Officer (OO) announced ‘I’ll get the fire picquet’. The Commanding Officer (CO) replied ‘You’ve had a long day Griffiths. Finish your meal’. When the OO went to raise the alarm several minutes later the CO insisted ‘Have your coffee first. It’s still not thoroughly alight.’ A few minutes later the CO announced ‘It can’t possibly be saved now’. And the problems with the canteen were resolved!
Ken was assigned to Headquarters Company, and was responsible for horse transport, making good use of his pre-war skills. Ken enlisted at a similar time to his friend, Phil Crowther, who was quickly promoted to Corporal, a rank that would normally see him commanding a section of around 10 men. The 2/1st Battalion embarked for overseas service on January 10th, 1940, aboard the SS Orford. The hospitality on board was very well regarded, the Sergeants Mess serving Roast Leg of Pork, Beef Ribs and very cheap beer!


Deployed to the Middle East, the battalion arrived in Egypt on February 13th, 1940. Subsequently, it moved to Palestine, concentrating with the 16th Brigade at Julis near Gaza. The soldiers of the 2/1st had several opportunities to visit tourist sites in the area, which they mostly knew from bible stories. In Jerusalem they often stayed at Hotel Fast, which was designated as the Australian Soldiers Club. One of Ken’s comrades from HQ company describes a fairly typical period of leave, although it must be noted that this is a letter home, so it may have been somewhat edited!
Monday, 8 April. Manoeuvres in morning. Left Julis at 1400 for four days leave to Jerusalem. We stayed at Hotel Fast. After we had drawn pay, Jack Ellis and I had coffee at a nearby cafe. Later we returned to the Fast for tea. A hot bath was enjoyed, then Jack Ellis, Lance Turner and I roamed through the streets of Jerusalem.
Private Charles Nathan, 2/1st Battalion
Tuesday, 9 April. Rose 0700. In morning toured Old City; entered Jaffa Gate. Saw Wailing Wall, Holy Sepulchre, Gethsemane, Hebrew University, Mount of Olives, War Cemetery and other places.
Bought souvenirs and stamps. After lunch strolled around the new city past Y.M.C. A. and King David Hotel. Pictures at night with Jack and Lance. Supper, then bed.
Wednesday, 10 April. At 0830, went by bus to Bethlehem. Saw Milky Grotto and Rachel’s Tomb. After lunch, went by bus to Dead Sea. Very salty indeed. Saw Elisha’s spring. After tea, I went to pictures, then to Tambur Cafe, where I spent a delightful evening listening to good music by a real live quartet. To bed about 0200”.
They also spent much time training, only now receiving some modern weapons, rather than the WWI era equipment they had mostly been using up to this point. They greatly appreciated swapping their Lewis guns for Bren Guns, and got to work with their new Anti-Tank Rifles and 2 inch mortars. They also trained with Bren Gun Carriers, light armoured vehicles that gave the Australian infantry a measure of their own mobility and firepower. Ken was trained to operate a carrier, as the unit moved from horse to motorised transport.


They spent many days on exercises in the Hebron Hills, and other areas in the vicinity. The brigade stayed in Palestine until August, moving to Egypt for active service preparations with the 6th Division. Ken’s friend Phil was transferred to an Anti-Tank unit at this time, meaning they would no longer be serving in the same unit. This would normally be a riskier part of the army to be serving in, and Phil was wounded during the campaigns in the desert, suffering a gunshot wound to the hand. But it was also to be a blessing to Phil, as his unit remained in the desert, avoiding the desperate fighting in Greece and Crete, and the long years of captivity that Ken endured.


Ken excelled in the role with Headquarters company, and the day after his friend Phil left the company Ken was promoted to Corporal to take his place. The war was becoming more serious, and the Australians were part of a British and Indian force that was taking the fight to the Italians in North Africa.
Into Battle
The 2/1st’s first campaign involved the advance from Egypt into eastern Libya in January and February 1941. Notably, on January 3rd, 1941, it participated in the first Australian ground action of the war, leading the attack to capture Bardia. Ken’s carrier platoon took part in the battle as part of the support element, providing covering fire for the assaulting soldiers of the rifle companies, ‘dismounted’ from their carriers, carrying all the bren guns they could manage. The platoon was waiting for their guide when the company commander arrived, insisting that they move off immediately. The start line lay north of their current position, however the heavily armed platoon moved east for a considerable time, directly towards the enemy!
Suddenly the anti-tank trench loomed out of the darkness and at that very moment our barrage opened up with a thundering roar. Shells from our artillery crashed in front and behind Stewart and his men who, very wisely, took shelter in the “ditch” where they remained for the next thirty minutes. When the barrage lifted to targets further in the fortress area, the lieutenant and some of the men crawled to the wire in front of them and began to cut their way through it.
The First at War: The Story of the 2/1st Australian Infantry Battalion, 1939-45, the City of Sydney Regiment
However, they were seen by the Italians in what was later found to be Post 41 and were machine-gunned, being forced to retire to the trench. Post 39 then opened fire on fixed lines along the ditch. Our men found a section of dead ground in which they spent a further most uncomfortable half hour during which they were unable to advance or retire and were subject to near misses frequently from our own and enemy artillery. An unexpected lull in fire from both sides heralded the arrival of 2/2nd Bn and the relief of the beleaguered force…Stewart’s force supported a number of attacks by 2/2nd Bn before making its way back to 2/1st Bn via positions held by B Coy.
Despite his intended role as part of the support element, Ken was involved in some of the fiercest fighting of the battle! The plan for the attack was fairly complex, and required strict adherence to the timetable. Despite the carrier platoon’s geographical embarrassment the 2/1st were up to the task, and the battle was successful beyond they Australian’s most optimistic hopes.

Later in the month, the battalion was at the forefront during the assault on the Italian-held port of Tobruk, a formidable fortress that commanded the best port on that region of the coast, making it a vital target. After the capture of Tobruk, the 2/1st garrisoned the city before leaving for Greece in March 1941 due to concerns about a German invasion.

The battalion faced the Germans at Veria in Northern Greece, the Ken’s carrier platoon spent some time detached from the main body of the battalion, screening the Aliakmon river, before withdrawing to the south. B company saw action at the Battle of Pinios Gorge, the remainder of the battalion were exhausted from serious mountaineering the days before, managing several steep ascents and descents over a few days in a bid to outmanoeuvre German mountaineer regiments. They were in Larisa during the battle of Pinios Gorge recovering in an abandoned industrial structure. The Battalion saw further action in Greece prior to their evacuation on 25th April from Megara.
‘Unsurpassed in the annals of Australian arms’
Instead of returning to Egypt, the battalion was redirected to Crete, where 2/1st Battalion Brigade Major Ian Ross Campbell was promoted to Lieutenant-Colonel and given command of the entire Rethimno defense. He had 1,270 Australian men under his command and eight field guns, including four captured Italian 100 mm heavy guns.
Several units of Greek soldiers were added to Campbell’s command, along with some local policemen from the town. These forces were in a sad state. Many of the Greeks didn’t have weapons. Some had no boots. Campbell sent several of them home, but he did find the local police were serious and had pistols and a few rifles. Ammunition was a bigger problem, with most of the Greeks in possession of only three rounds a piece.
Barrels filled with sand were lined up along the runway at Rethimno to prevent German planes from landing. There were two hills connected by a ridge overlooking the airfield, Hill A and Hill B. Col. Campbell dug two battalions in on these hills: 2/1st Battalion on Hill A with six guns and 2/11th Battalion on Hill B with the remaining two guns. He placed his HQ and the 4th Greek Battalion on the ridge between them, with the 5th Greek Battalion to the rear. He also had two British Matilda tanks at his disposal, which he placed in a gully near the landing strip. Campbell and his mixed-up brigade didn’t have long to wait.
There was little or no leisure during the ensuing few days which were occupied in digging our two guns into pits, camouflaging them and preparing our defences for the assault that was expected at any hour. The guns were in the corners of a wheat field on the side of a hill (Hill A) overlooking the aerodrome. At thirty yards distance they were invisible, a feat of camouflage of which were were very proud. Lacking camouflage nets we had requisitioned fishing nets in the town and woven them with wheat stalks.
Lew Lind, 2/3rd Field Regiment

Ken was stationed with 2/1st Battalion HQ, just inland from the airstrip. Despite his nominal support role, Ken found himself in the thick of the action once again. The evening following the German parachute landings Ken’s carrier platoon was being used as a mobile reserve.
I was ordered to take the platoon out on road and beach patrol on foot after dark. We left the entrance of the airstrip at 2200 and went across the airstrip to the road. We just reached the other side when we ran into a party of Gerries. I was leading the platoon in extended line. Gerry was moving diagonally across my front. I challenged them and immediately they went to ground and opened fire with pistols and Tommy guns. We were so positioned that I could only bring one Bren, one rifle and my pistol on to them. Luck was with me; we killed one and wounded two and the others made off. We had no casualties. The activity brought fire not only from Gerry’s machine guns, but also the Greeks’ and some of our own. We could not move for nearly an hour. Still no casualties.
Lt Pat Lawry, Carrier Platoon, HQ Coy, 2/1st Bn
The return of the platoon to the Battalion HQ position led to a somewhat farcical exchange with the sentries, as Lt Pat Lawry struggled to remember the correct password of the day. A voice with a broad Scots accent called out the word “hoop”. Pat remembered the challenge for the 20th was the word ‘hope’, to which friendly troops were to reply ‘springs eternal’. Pat says these particular words eluded him. He knew the correct response had something to do with breasts, but it had been a trying night, what with one thing and another. He attempted to dispense with formalities, he knew the sentry well and was sure the sentry knew who he was. ‘It’s the Carrier Platoon patrol Hackett’, he said, ‘as you well know’. ‘Hoop’, said Hackett. ‘I know very well it’s Lt Lawry but you’re not coming in until you give the password’!
Over the following week the 2/1st Battalion fought hard, steadily pushing back the Germans and taking many prisoners. Ken’s carrier platoon took part in an attack personally led by Lt. Col. Campbell, the 2/1st’s commander. This mixed force of reserves attacked up the north-west slopes of hill A. It was a determined attack, with MG-34 rounds zipping through the air all around them. The long Australian ‘Gallipoli’ bayonet caused many casualties among the German defenders, who retreated in a panic as the tall and ferocious men from New South Wales and Victoria swarmed up the hill. Campbell’s attack took the hill and captured 69 German prisoners. The battalion also recovered the two Matilda tanks and pushed the stricken Germans off the airfield.
On May 26th, Colonel Campbell launched a major attack on the olive oil factory, the major German strongpoint. 2/1st Battalion joined up with the remains of the Greek 4th Battalion and they stormed the factory. There was hand-to-hand fighting, but the Germans were eventually overrun. The Australians took 100 prisoners and had cleared out the Germans near Hill A. However, on the western end o Crete the position was not good for the Allies. Maleme airfield fell to the Germans on the same day Campbell seized the olive oil factory. Transport aircraft with mountain infantry were already beginning to land by the end of the day. Some of these carried light Panzer II tanks and Sd.Kfz.222 armored cars, providing heavy hitting power for the invaders. They also brought waves of motorcycle troops for fast movement.
The Germans began pushing the British and New Zealanders eastwards from Maleme, towards Rethimno. The Germans surrounded and captured several isolated British units during their advance and the defenses of the island began to fall apart. There was incessant bombing and strafing from the Luftwaffe, which had total air dominance over Crete. General Freyberg, commanding Allied defences of Crete, gave the order to retreat towards the south coast on 28th May. The defenders were to be evacuated to Egypt. The orders never reached Campbell and the Australians at Rethimno. Freyberg had sent a courier out with orders on the night of the 27th but he had been captured by a German patrol, so the Australians had no idea about the evacuation.
The advance units of the 141st Mountain Regiment and tanks from the 31st Panzer Regiment appeared to the west of Rethimno and quickly attacked picket lines to the south of Hill B. It took only a few hours for the advancing German 5th Mountain Division to surround and isolate Campbell and his men at Rethimno. Colonel Campbell realised it was over. He began negotiations for surrender at noon on May 31st and released all his German prisoners as a sign of goodwill. At 13:00, 934 Australians surrendered to the Germans. Despite their defeat, Ken had been part of one of the most impressive Australian military actions.
The Retimo sector was the only one in which Germans outnumbered the Empire troops. Their courage and spirit in the defence of Retimo is unsurpassed in the annals of Australian arms. For a loss of 120 dead and 182 wounded they had inflicted casualties totalling 700 killed and taken 500 prisoners. It was a superlative performance by the two depleted Australian battalions and their Greek comrades, darkened only by a destiny which decreed that the majority would have to spend the next four years as prisoners of war.
Peter Firkins, Australians in Nine Wars
Evasion, capture, camps
This is the point at which Ken’s story diverges somewhat from that of the remainder of the 2/1st at Rethimno. The vast majority of the unit were captured there and then, many in the area around Battalion HQ, which was surrounded by German tanks and armoured cars. Ken, however, was not. A small number of officers and men managed to get away from Rethimno as the German cordon closed around it, Ken was among them. They moved south, through the mountains of Crete, towards the south coast beaches where evacuations were taking place. These evacuations had been taking place for several days before the surrender at Rethimno. In total 52 of the Australian defenders of Rethimno were evacuated to Egypt. Ken was also not amongst this group.
The window of time for the Australian defenders of Rethimno to reach the south coast was vanishly short. It was rough country, with mountains reaching 2,500m, under continuous German air observation and attack. This meant that most evaders moved only at night, which then also made navigation difficult. The Rethimno defenders also didn’t know which particular beaches were being used for the evacuations. Within a couple of days the main evacuations ceased, as the German forces consolidated their hold on the island.
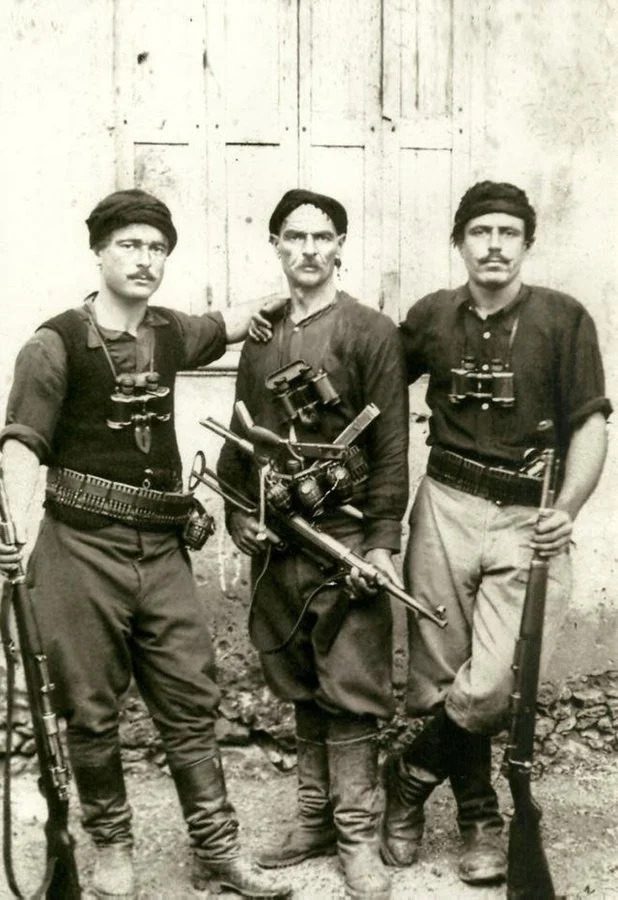
Ken spent the period from the 31st May to the 11th of July on the run in Crete, an incredible 6 weeks evading capture. In situations such as this, most soldiers are captured within a few days. Ken probably received support from Cretan civilians, who fiercely resisted the German invasion, and assisted many Allied soldiers throughout the German occupation.
During this time Ken was reported missing, his family receiving a telegram on the 9th of June, and being listed amongst the missing in the Sydney Morning Herald on the 19th June. He spent several weeks after he was listed as missing evading the Germans on Crete. Eventually, Ken’s luck ran out. He was captured by the Germans on 11th July and moved to a POW camp. A small victory of his evasion was that he avoided some of the time his comrades spent in the German transit camp at Salonika, which was well known for its harsh, unsanitary conditions.


Ken was transferred to Stalag VIII-B, a large German prisoner-of-war (POW) camp near the town of Lamsdorf, in what was then Upper Silesia (now part of Poland, near the town of Łambinowice). This site had a long history of internment, with barracks originally built to house British and French POWs during World War I. It had also served as a detention facility for prisoners of war during the Franco-Prussian War of 1870–71.
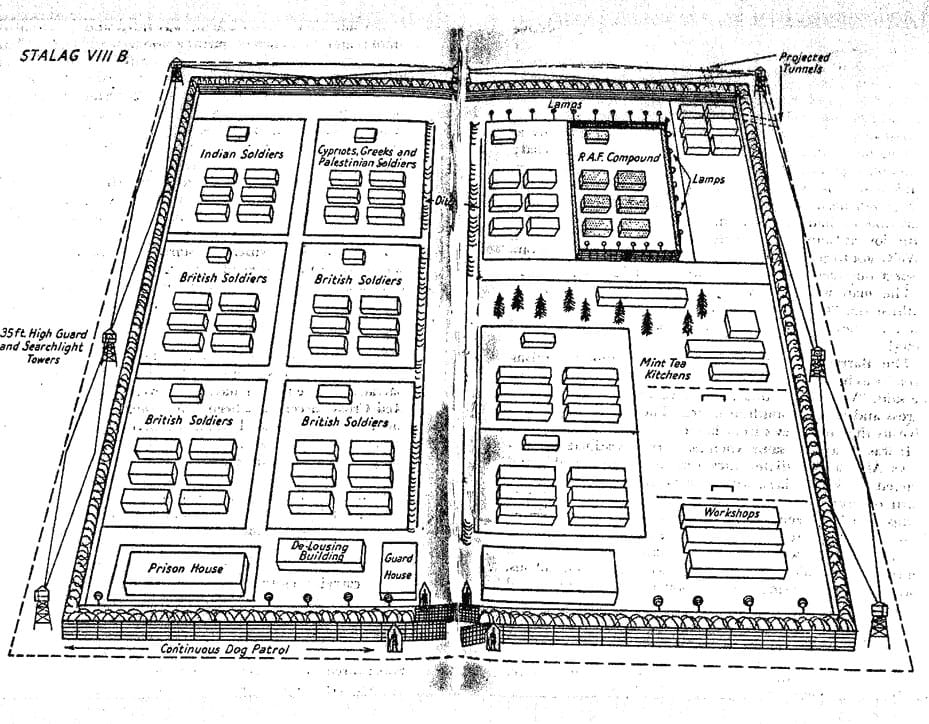


The living conditions in the camp were described simply as ‘bad’, living in ‘overcrowded huts’ with electric lighting and poor heating. Food rations were described as ‘bad’ and of ‘poor’ quantity. The food was so bad that a number of Allied POWs at the camp went on strike from they work the Germans required them to do. However this attempt was unsuccessful, and the strikers were severely punished. Camp sanitary facilities were ‘bad,’ but bathing and washing were ‘fair.’ As for clothing, they were issued was ‘British battle dress, sent by the Red Cross.’
Labour was paid 70 pfennigs per day, with work including stone quarry work for 9 hours a day, or farming for 12 hours a day, both 6-7 days per week. Surprisingly, it would seem that in terms of entertainment, the camp did fairly well, sport, entertainment, and reading (including camp newspapers) were readily available, ‘all Red Cross stuff.’ The POWs received mail regularly.


Ken spent almost three years enduring the harsh conditions of this POW camp,which was later renamed Stalag 344, braving overcrowded barracks and hard labour on the camp’s farms. In 1944, he was transferred to Stalag 357, just to the east of the town of Fallingbostel in Lower Saxony, in north-western Germany.
Stalag 357 housed 17,000 POWs; mostly British, but also Russian, Polish, Yugoslav, French, and American prisoners. It was severely overcrowded, each hut was jammed with 400 men, though it had bunks for only 150. By February 1945 the POWs were suffering from lack of food and medical supplies exacerbated by the influx of several hundred American POWs captured in the Battle of the Bulge and Operation Nordwind. These newer arrivals found themselves accommodated in tents.
The camp was liberated by the British 7th Armoured Division on 16th April 1945. Ken arrived in the UK on the 14th May 1945, beginning a period of recovery and recuperation after his long imprisonment. After a month in the UK he embarked for Australia on the J12, arriving in Sydney 23rd July 1945. Ken was discharged, ‘at his own request on compassionate grounds’, on 29th August 1945.
Ken spent 2,141 days in uniform, of which an incredible 2,021 days were overseas. For his service, Ken received several medals, including the Defence Medal, the War Medal 1939/45, the Australian Service Medal 1939/45, and the Africa Star.
Ken is commemorated on the Ballarat Australian Ex-Prisoners of War Memorial.
The text of this article was commissioned by History Guild as part of our work to improve historical literacy. If you would like to reproduce it please get in touch via this form.